You can’t drag a clip to the Timeline in Premiere Pro. Frustrating. Maybe you dragged the first clip into the timeline successfully, but attempting to drag the second clip in fails. Maddening! Sometimes you can drag in video, but cannot drag in audio. Other times you can drag in audio but the video doesn’t follow. What’s going on here?
The issue is that you are using a two step process to drag clips into the Timeline. The actual process requires 3 steps.
Process for dragging clips into the Timeline successfully.
- LOAD: Select the clip in the Project panel (or double click to load into the Source Monitor).
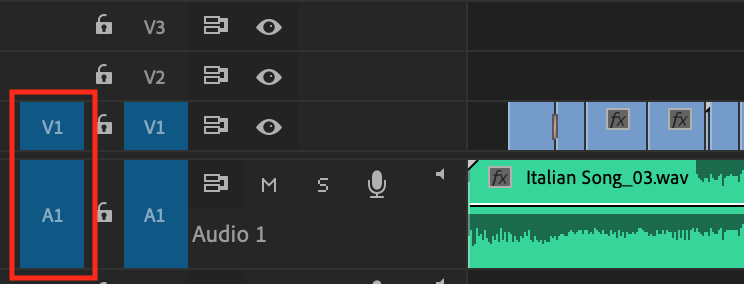
- PATCH: Look down at the Track Header at the left of the Timeline. Make sure the V1 and A1 Source Patchers (blue boxes) are patched to the track you intend to drag it to. All 4 blue boxes should be enabled.
- EDIT: Drag the clip to the Timeline from either the Project panel or the Source Monitor to the Timeline.
The clip is now edited to the track you intended (V1 and A1, shown here).
Here is the official documentation from Adobe: Source patching and track targeting.
Some commentary from my experience as an editing instructor:
- Many newer editors simply drag from the Project panel to the Timeline with no knowledge of the vital step, Step 2, so failure is high.
- If you don’t know about Step 2, you may fail in step 3.
- The mantra: “ENABLE SOURCE PATCHERS BEFORE YOU DRAG”
- The interim step of loading the clip into the Source Monitor by double clicking it from the Project panel prevents that failure with automatic source patching.
- Newer editors tend not to preview the clip in the Source Monitor, skipping a conventional editing process. An editor should load a clip into the Source Monitor for many reasons. Why should you want to do this?
- Loading the clip into the Source Monitor provides you a quick view of the clip before committing it to your program.
- This allows you to mark the clip’s In and Out points ahead of time, so less timeline trimming is required.
- Playback in the Source Monitor allows for a quick quality and performance check of the audio and video.
- Automatic Source patching is more robust here, as mentioned.
- For those unaware of Step 2, selecting the clip in the Project panel should also automatically set up Source Patching, except it does not work with 100% reliability. The editor must ensure that.
- Automatic Source Patching can fail with certain files like screen captured H.264 and other Long GOP files. It’s better to load it into the Source Monitor as a failsafe, then look down at your patching.
This FAQ covers this issue in depth. This article was inspired by one of the many forum posts on this very topic.
Welcome to my Adobe Premiere Pro 101 series. This article is the first in a series I am planning to help newer editors fill in important gaps of knowledge.