
Smart Rendering Workflow for Exports
I am so glad I employ the smart rendering workflow as often as possible when working in Premiere Pro, especially for the exporting process.
I think that many editors get themselves into a jam too often at deadline when changes are afoot and mistakes are uncovered when exporting. Found a mistake while watching down your show? Then you’ll be forced to “redo” that export. This. Takes. Time. Time that you probably don’t have. Then the stress level starts going up, does it not?
Let’s say you’re cutting H.264 that you acquired from your mobile phone or camcorder (as you are probably used to doing) instead of native or transcoded ProRes, DNxHD/HR or Cineform footage which you can make happen on ingest. Since you are not employing a smart rendering workflow, you are subject to wasting a lot of time. You are time-penalized by making the fix, then, on export, you need to process any effects and re encode the entire piece, usually to H.264. Talk about a drain on your time.
What if you caught another mistake on a second watch down? That’s right, you have to sit through the entire exporting process once more. Painful. There is a better way.
If you are cutting like I do, with ProRes, or any of the other smart rendering aware codecs, just make the fix—re render the preview—then export once more. The ProRes codec export is much, much faster than waiting for another H.264 export since you are merely copying preview files into a new container rather than re processing and re encoding the entire contents of your timeline: you’re using smart rendering in this scenario. This may only take a few minutes compared to the better part of an hour or more.
With this “master” file, you can create H.264 copies at high quality. If you are uploading to YouTube, Vimeo or other service, you can usually upload the original master. This takes longer, but results in higher quality video for your audience.
Smart Rendering: Is it worth your time?
Though it took you some time to prep your material, and filled up your drive space with preview files and transcoded video files, I believe you are saving yourself time in the long run, especially during the exporting process, and particularly if there are changes that are required after you have already exported for the first time.
Furthermore, you get fewer errors on export (error compiling movie, etc.) since much of the computer processing required for processing effects, especially GPU accelerated effects, have already been back loaded to your preview files.
Of course, the time it takes in rendering previews comes into play when you consider overall exporting time, but hopefully you off loaded that during breaks you took while editing, not while you are awaiting an export on “bated breath.”
I don’t know about you, and maybe I’m just getting older, but I find a ton of mistakes on watch down, and never catch all of them at once (blasted typos on lower thirds!). For me, this sometimes requires several attempts at exporting a program. With smart rendering, this iterative process goes much faster and that satisfies my perfectionist tendencies.

Smart Rendering Basics
Don’t yet know the basics of smart rendering? Basically, to employ smart rendering you need to do the following:
- Before Editing:
- Transcode any Long GOP footage to ProRes, DNxHD/HR, or Cineform during ingest or prior to importing the footage (see this article which shows you how to ingest media automatically in the background while you begin editing).
- You can also capture this footage natively to these codecs while shooting with certain cameras or recording systems (Atomos devices, etc.). It turns out that a lot of recent camera formats are available for smart rendering, including certain flavors of XDCAM. More info here.
- Change your Sequence Settings to create Preview Files using the same codec you transcoded to or captured your original footage to.
- Choose Sequence > Settings, then set Editing Mode to Custom. This “unlocks” the ability to change settings for Preview files.
- For Preview Files, change settings to match to the footage’s codec settings precisely.
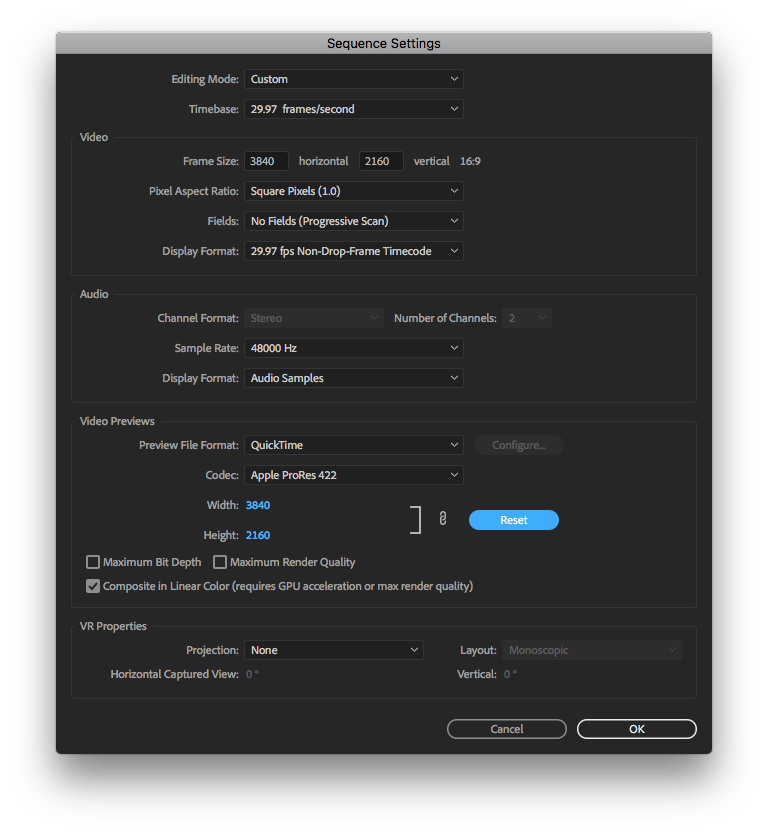
Sequence Settings with new settings for Preview files set to ProRes
- While you are editing:
- Render any clips you have added an effect to whenever you get a free moment, ideally when you are taking a break.
- Render the entire timeline before attempting to export.
- Before exporting:
- Change settings to export to the same codec you ingested and set previews to in the Export Settings dialog box.
- Check the “Use Previews” checkbox in the Export Settings dialog box, as well. This ensures you are merely copying files rather than processing and encoding the files.
Here are a couple of links that may be helpful:
- Adobe Premiere Pro Help: Smart Rendering
- Adobe Premiere Pro FAQ: FAQ: How do I speed up rendering, exporting, or encoding?
Premiere Pro New Features – Smart Render for ProRes and Preview Files from reTooled.net on Vimeo.
Smart Rendering Codecs: Easier To Edit With
I should also point out that it is a much nicer editing experience when cutting with ProRes or the like, over Long GOP footage like H.264 or AVCHD. You drop fewer frames, and can view in a higher resolution with these intraframe codecs. You can even create proxies for them if you have an underpowered computer system and need better fluidity when editing.
A Hybrid Workflow for Smart Rendering
If you are under certain constraints, you can cut a few corners regarding employing the smart rendering workflow. Consider the following:
- You do not have the time (or drive space) to transcode.
- You didn’t have the right device to acquire smart rendering footage on location.
- You created proxies from the Long GOP footage and plan to cut with those.
- You can edit Long GOP footage acceptably with your computer and don’t want to go through the hassles of setting up a pure smart rendering workflow.
- A combination of all these things.
If you find yourself in one of the above situations, you can still use a portion of the smart rendering workflow, however, you may spend more time and drive space overall for previews.
Essentially, the hybrid workflow consists of:
- Cutting with Long GOP footage.
- Setting up Sequence Settings to render previews in a smart rendering codec (see Smart Rendering Basics for the technique)
- Render the entire sequence prior to exporting.
- Export to the same codec you set for rendering previews. Don’t forget to check the “Use Previews” checkbox for the fastest possible exports.
YouTuber “EposVox” uses this workflow. See this video for his explanation how smart rendering has improved his editing outlook.
Epilogue for Smart Rendering
I hope that you can try the smart rendering process for your own projects. Let me know in the comments below if you have further questions. Good luck on all your projects.